For 5 years and 115,000 km, the wife’s 2007 Nissan Versa SL has been very reliable. This winter, something finally broke: the heating and air conditioning fan would only work on the highest setting.
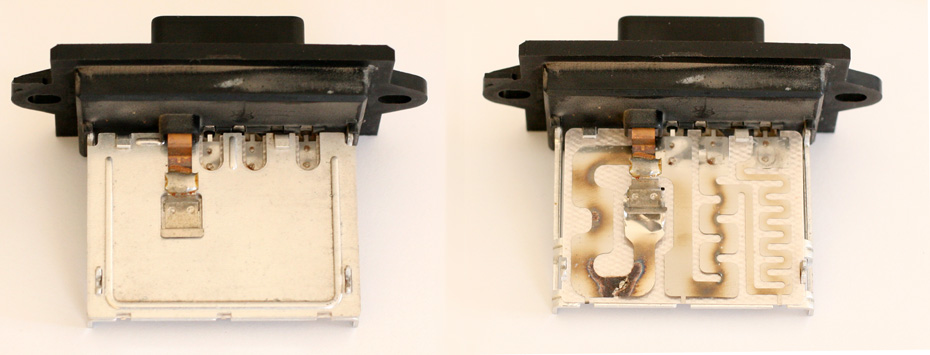
This failure is caused by a burn in the resistor pack. When the dial is turned to the highest setting, the fan’s power comes directly from the electrical bus. On lower settings, the electricity first passes through a series of resistors which limit the amount of current flowing to the fan, slowing it down.
Although I’m not thrilled that it broke, I’m glad that the HVAC system employs fault tolerant design and graceful degradation. Even if the resistor pack fries in the middle of a trip, the driver can still use the highest setting to keep the wind-shield free of frost and make it home safely, although we were boiling from all the heat and had to drive with our jackets off.
How to Repair a Fan that Only Works on Highest Setting (4)
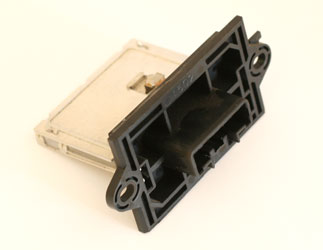
 This is a photo of the offending resistor pack after I removed it from the car. As you can see, it is held in place by two screws, and has an electrical connector plug in the centre. This should be a piece of cake to replace, right?
Not so fast.
The resistor pack is located in the centre console stack, just forward of where the driver’s right knee is. Unfortunately, gaining access to the resistor requires removing many other parts first.
The basic procedure is:
-
- Remove the lower plastic trim panel from beneath the steering wheel
- Remove the panel for the fuse box. Use a philips (+) screw driver to remove the two screws
- Gently pull the panel towards you, releasing the plastic clips
- You will probably want to remove the one screw that attaches the white OBD2 connector to the plastic panel
- Remove the lower plastic trim panel from beneath the steering wheel
-
- Remove the brake pedal assembly (which also has the e-throttle attached to it)
- The brake pedal assembly is bolted to the firewall with four 12mm nuts. You will need a deep socket.
- You will need to remove the pin that connects the brake pedal to the master cylinder rod. The pin in held in place with both a cotter pin and a white-plastic expanding tip on the end of the metal pin. I cursed for 20 minutes while using a pair of needle nose pliers to gently remove the pin without breaking the plastic tip.
- Remove the brake pedal assembly (which also has the e-throttle attached to it)
- Okay, now you can replace the resistor pack.
- Disconnect the electrical connector by squeezing it hard and pulling
- Remove the two screws and pop-in the replacement part
- This, of course, will be the easiest step in the entire process
I’m an experienced “weekend mechanic”, and it still took me over two hours to complete this task.
Here are two shots of the broken resistor pack. On the left, you can see that the resistors are encased in a flat-plate aluminium heat-sink. On the right, with the plate removed, it’s easy to see where the circuit burnt. If this happens again, I’ll consider increasing the cooling capacity by using thermally conductive adhesive to glue an additional heat-sink to the aluminium plate in the vicinity of the burnt wire.
The Bottom Line
Due to the dangers inherit in messing with the brake pedal (and the gas pedal, which it is attached to it), I wouldn’t recommend trying this at home unless you are a very confident amateur mechanic. When in doubt, pay a professional.
| The Bottom Line | |
| Level of difficulty | Medium |
| Min. completion time | 2 hours |
| Special tools required | None |
| Parts required | Resistor, Nissan Part # 27150-ED00A |
| Total cost | $53.00 Canadian + tax |

