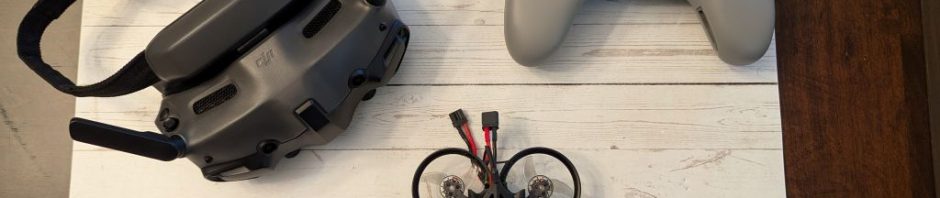
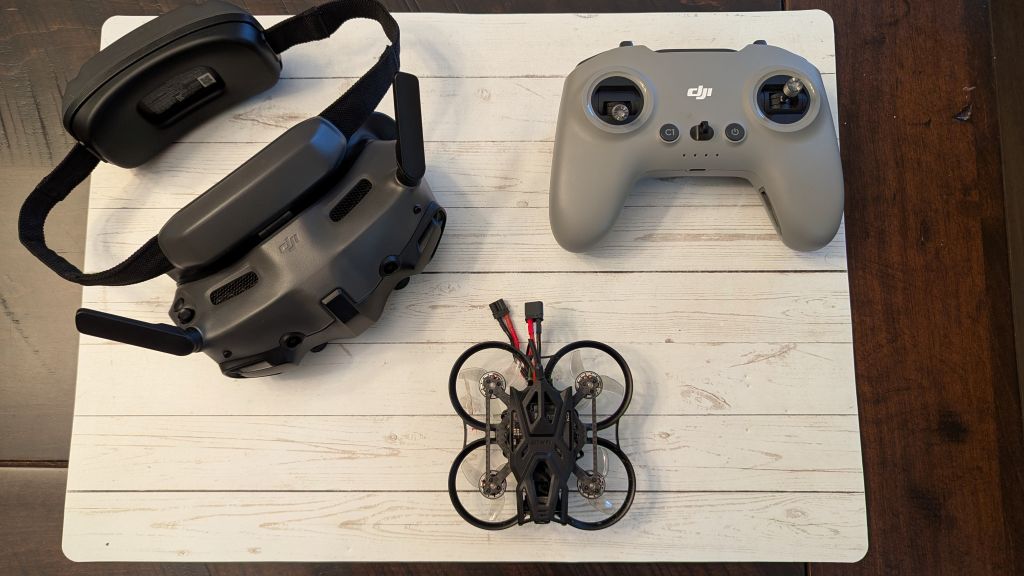
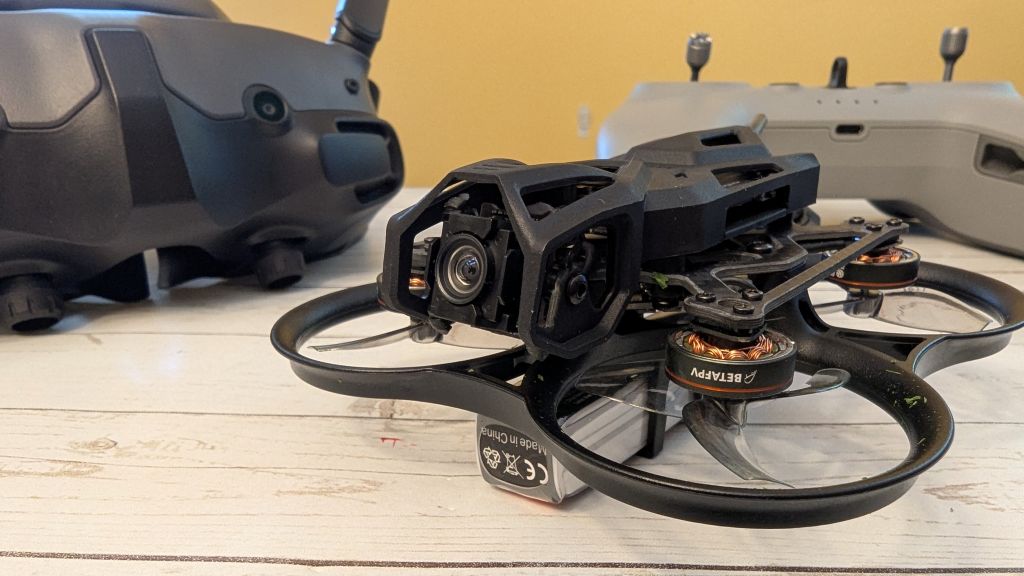
My son and I started our Remotely Piloted Aircraft System (RPAS) education by buying a DJI Avata 2 First Person View (FPV) drone, which is a technological marvel but extremely difficult to repair after a crash. When my son ventured into freestyle FPV flight (he flies, I fix), we continued to use the DJI Goggles 3 that came with the Avata 2, but we bought a DJI FPV Remote Controller 3 and transitioned to BETAFPV micro drones that came pre-built with DJI 04 video transmitter air units. Replacement frames for BETAFPV micro drones typically cost less than $15 USD and can be swapped-out in just a few minutes, which I can’t say is true of the Avata 2!
Our previous BETA FPV Meteor74 Pro O4 bound to our DJI controllers with minimal configuration, but this wasn’t the case with the Pavo Femto DJI O4 drone that we purchased in April, 2025. After an afternoon of fiddling with BETAFLIGHT settings, we finally managed to get the DJI Googles 3, DJI Controller 3, and Pavo Femto to bind properly, the On Screen Diagnostics (OSD) to work the way my son likes, and for the drone to arm and fly. I thought I would share the most difficult part of the configuration process so that others can learn from our toil.
Prerequisites
There are plenty of high quality videos and tutorials elsewhere on the internet that explain how to complete the following prerequisite steps.
- Configure the throttle on your DJI FPV Controller 3 to be dead-stick
- Bind your DJI FPV Remote Controller 3 to your DJI Googles 3
- Ensure that the firmware for the DJI Googles 3 and DJI FPV Controller 3 are up to date
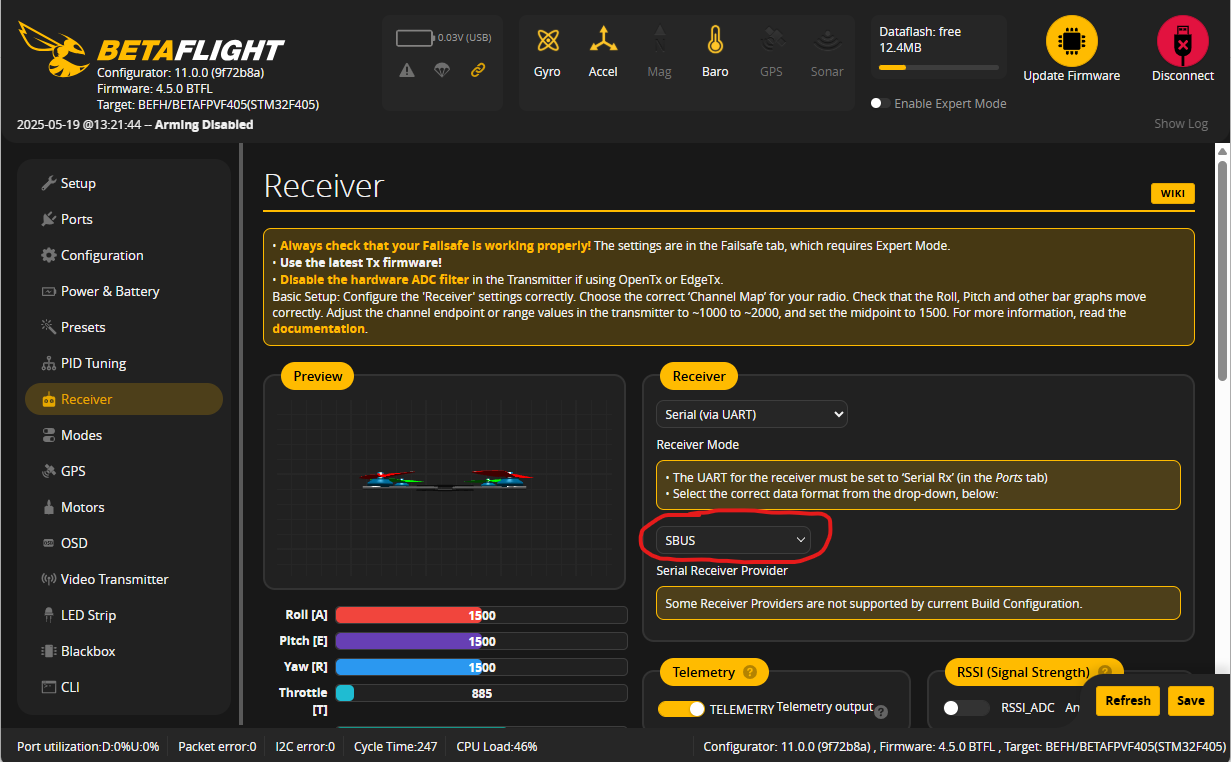
- Configure your DJI Googles 3 to connect to DJI 04 Air Unit
- In DJI Googles 3 menu select
Settings --> Control --> Protocoland change toSBus Baud Fast - Connect the Pavo Femto to a laptop using a USB C cable and the USB adaptor
- Use a fan to cool the Pavo Femto, otherwise it may overheat.
- Using a Chromium-based browser, visit BETAFLIGHT and connect to your Pavo Femto
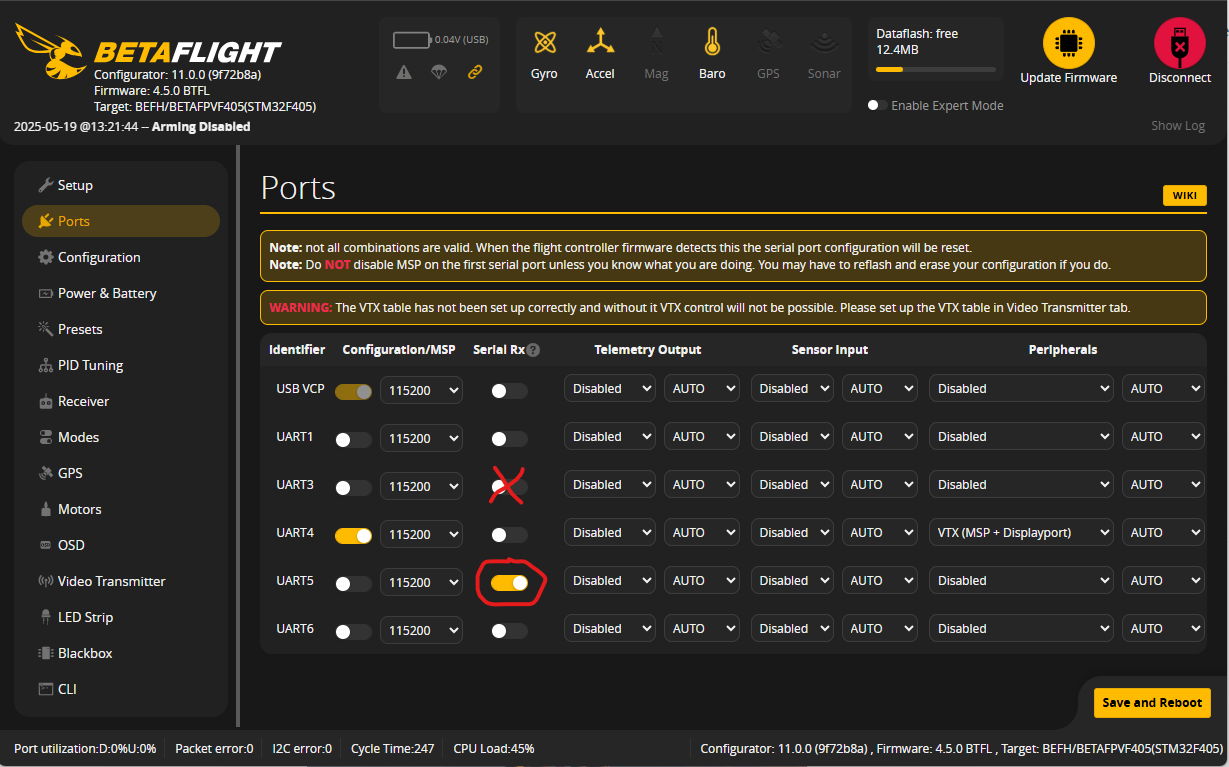
Beta Flight CLI Configuration for Pavo Femto with DJI Googles 3
In BetaFlight, at the bottom of the menu on the left side, select CLI (Command Line Interface). In the textbox labelled “Write your command here. Press Tab for AutoComplete”, cut-and-paste all of the commands, below.
# version
# Betaflight / STM32F405 (S405) 4.5.0 Dec 25 2024 / 08:01:31 (c155f5830) MSP API: 1.46
# config rev: 16ac022

# start the command batch
batch start

# reset configuration to default settings
defaults nosave

board_name BETAFPVF405
manufacturer_id BEFH
mcu_id 002600423134501920343842
signature

# name: Pavo Femto

# feature
feature TELEMETRY
feature LED_STRIP
feature OSD

#################################
# Serial configuration for BetaFPV Pavo Femto when used with
# DJI Googles 3 and DJI FPV Controller 3.
#
# Your DJI Googles 3 must also have Sbus Baud Fast enabled
set sbus_baud_fast = on
# By default, Pavo Femto is setup for CRSF. DJI only
# supports SBUS
set serialrx_provider = SBUS

serial 20 1 115200 57600 0 115200
serial 0 0 115200 57600 0 115200
serial 2 0 115200 57600 0 115200
serial 3 131073 115200 57600 0 115200
serial 4 64 115200 57600 0 115200
serial 5 0 115200 57600 0 115200
#################################

# beeper
beeper -GYRO_CALIBRATED
beeper -RX_LOST
beeper -RX_LOST_LANDING
beeper -DISARMING
beeper -ARMING
beeper -ARMING_GPS_FIX
beeper -BAT_CRIT_LOW
beeper -BAT_LOW
beeper -GPS_STATUS
beeper -RX_SET
beeper -ACC_CALIBRATION
beeper -ACC_CALIBRATION_FAIL
beeper -READY_BEEP
beeper -DISARM_REPEAT
beeper -ARMED
beeper -SYSTEM_INIT
beeper -ON_USB
beeper -BLACKBOX_ERASE
beeper -CRASH_FLIP
beeper -CAM_CONNECTION_OPEN
beeper -CAM_CONNECTION_CLOSE
beeper -RC_SMOOTHING_INIT_FAIL

# beacon
beacon RX_LOST
beacon RX_SET

# led
led 0 0,0::CO:10
led 1 1,0::CO:10

# aux
aux 0 0 0 900 1600 0 0
aux 1 1 1 900 1300 0 0
aux 2 2 1 1300 1700 0 0
aux 3 13 2 1700 2100 0 0
aux 4 35 3 1650 2100 0 0

# master
set gyro_lpf1_static_hz = 0
set gyro_lpf2_static_hz = 550
set dyn_notch_count = 0
set dyn_notch_q = 500
set gyro_lpf1_dyn_min_hz = 0
set acc_calibration = -7,18,-15,1
set baro_hardware = AUTO
set dshot_idle_value = 1300
set dshot_bidir = ON
set motor_pwm_protocol = DSHOT300
set motor_poles = 12
set motor_output_reordering = 2,3,0,1,4,5,6,7
set align_board_roll = 180
set vbat_min_cell_voltage = 335
set vbat_warning_cell_voltage = 345
set ibata_scale = 510
set ibata_offset = -300
set small_angle = 180
set pid_process_denom = 2
set simplified_gyro_filter_multiplier = 110
set osd_rssi_dbm_alarm = -100
set osd_vbat_pos = 2561
set osd_rssi_pos = 192
set osd_link_quality_pos = 2496
set osd_rssi_dbm_pos = 2464
set osd_rsnr_pos = 160
set osd_tim_2_pos = 3629
set osd_flymode_pos = 3598
set osd_throttle_pos = 3566
set osd_crosshairs_pos = 2361
set osd_current_pos = 2592
set osd_craft_name_pos = 2646
set osd_warnings_pos = 14837
set osd_disarmed_pos = 2103
set osd_esc_tmp_pos = 129
set osd_core_temp_pos = 225
set debug_mode = GYRO_SCALED
set craft_name = Pavo Femto

profile 0

# profile 0
set dterm_lpf1_dyn_min_hz = 78
set dterm_lpf1_dyn_max_hz = 157
set dterm_lpf1_static_hz = 78
set dterm_lpf2_static_hz = 157
set p_pitch = 59
set i_pitch = 96
set d_pitch = 62
set f_pitch = 57
set p_roll = 51
set i_roll = 83
set d_roll = 44
set f_roll = 50
set p_yaw = 51
set i_yaw = 83
set f_yaw = 50
set d_min_roll = 44
set d_min_pitch = 62
set feedforward_averaging = 2_POINT
set feedforward_smooth_factor = 60
set feedforward_jitter_factor = 10
set simplified_master_multiplier = 105
set simplified_i_gain = 90
set simplified_d_gain = 140
set simplified_pi_gain = 110
set simplified_dmax_gain = 0
set simplified_feedforward_gain = 40
set simplified_pitch_d_gain = 125
set simplified_pitch_pi_gain = 110
set simplified_dterm_filter_multiplier = 105
set tpa_breakpoint = 1320

profile 1

profile 2

profile 3

# restore original profile selection
profile 0

rateprofile 0

# rateprofile 0
set roll_rc_rate = 5
set pitch_rc_rate = 5
set yaw_rc_rate = 5
set roll_expo = 45
set pitch_expo = 45
set yaw_expo = 45
set roll_srate = 72
set pitch_srate = 72
set yaw_srate = 54

rateprofile 1

rateprofile 2

rateprofile 3

# restore original rateprofile selection
rateprofile 0

# Don't forget to save configuration
save
In Case You’re Interested: How does the config, above, differ from the default settings?
The Serial Rx Channel must be set to UART 5, not UART 3, to communicate with the DJI O4
The protocol must be set to SBUS, not the default of CRSF.
(Optional) Enable the DISARM message to be displayed in the OSD (On Screen Diagnostics), making it easier to diagnose arming configuration issues.
The SBUS BAUD FAST must be enabled (verify that it is also enabled in your Goggles 3), which is done by executing code on the command line: set sbus_baud_fast = on
How Do I Arm My Pavo Femto for Flight Using Googles 3 and Controller 3?
After you use BETAFLIGHT to program the flight controller, simply disconnecting the USB cable may not be sufficient for arming the drone for launch. If you see “MSP” in the goggles display, the flight controller believes that it is still connected to USB and will not allow the drone to arm. This can be rectified by disconnecting the drone battery and re-connecting.
Don’t Be Dumb Like Me
If the DJI Goggles 3 prompt you to calibrate the position of the DJI Controller 3, the first step will ask you to “Center the Sticks”. I did this by letting go of the sticks. As the left throttle stick is now configured for dead stick, I made the mistake of letting it sit at the bottom of the gimbal. Later, this caused the flight controller to believe that the stick was not sufficiently lowered when I attempted to arm the drone, and I wasn’t able to take off. When the Goggles 3 ask you to calibrate your Controller 3, you need to place the left stick as close to the center of the gimbal as possible during the first step of configuration, and then verify in BETAFLIGHT that the throttle range smoothly swings from 1000 to 2000 without any glitches. Drone arming is not permitted unless the flight controller sees that the throttle is below 1050.
On the Controller 3, flip the MSN toggle switch on the upper left of the controller to the N position. The drone should now be armed and ready to fly. Have a happy flight!
Appendix
How to convert your DJI Controller 3 to Be Dead Stick Configuration
Peel back the rubber on the back of the controller and use the provided hex key to tighten the 2 bolts to add some throttle drag to the left stick. Do not over-tighten: the goal is to use the minimum amount of tension necessary such that you can push the stick all the way down, release your finger, and have it remain in position at the very bottom of its throw.